

Introduction
When a mobile app requires user authentication, it typically involves various providers like Google, Facebook, or traditional email-password systems. While Flutter, combined with Firebase and other authentication tools, simplifies this process, issues can still arise during the login or sign-up phase.
These issues can stem from incorrect configurations, outdated methods, or integration challenges. Fixing them is necessary for providing a smooth UX. Let’s explore the common problems developers encounter with logging in and signing up in Flutter apps and provide detailed steps to resolve them.
Google Authentication Issues
Android: PlatformException sign_in_failed
Problem
One of the most frequent errors encountered when using Google Sign-In with Firebase in Flutter is the following error:
[log] signInWithGoogle: PlatformException(sign_in_failed, com.google.android.gms.common.api.ApiException: 10: , null, null)This issue usually arises from an incorrect configuration of the Firebase project and the app.
Preconditions
Before attempting to resolve this error, ensure that the following conditions are met:
FirebaseOptionsare generated, andFirebase.initializeApp(options: options)is called.- The
google-services.jsonfile is correctly placed under theandroid/appdirectory.
Solution
Step 1. Runkeytool.exe -genkey -v -keystore ./android/upload-keystore.jks -keyalg RSA -keysize 2048 -validity 10000 -alias upload and answer the questions as needed.
Step 2. Create a key.properties file in the android directory with the following content:
storePassword=the-password-you-wrote-during-questionnaire
keyPassword=the-password-you-wrote-during-questionnaire
keyAlias=upload
storeFile=../upload-keystore.jks
Step 3. Run the following command to get the SHA-1 and SHA-256 fingerprints: keytool.exe -v -list -keystore ./android/upload-keystore.jks
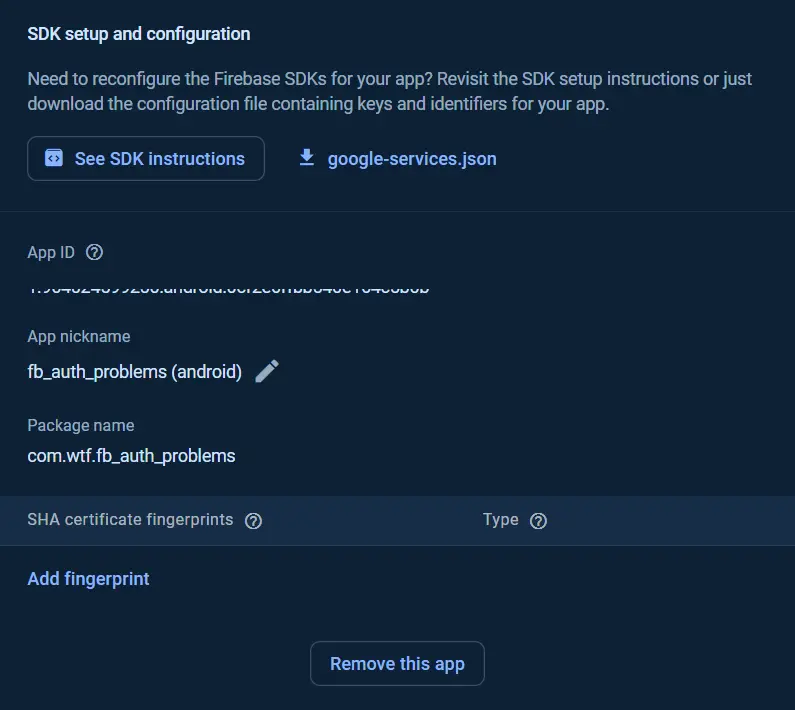
Step 4. Add these fingerprints to the corresponding Android app in your Firebase project:
Still not working?
If the error persists, follow these additional steps:
- Navigate to the Android folder in your terminal:
cdandroid; - Run the signing report:
./gradlew signingReport; - Add all retrieved SHA-1 and SHA-256 fingerprints to the Firebase project.
By following these steps, you should resolve the sign_in_failed error and enable Google Sign-In for Android users.
Web: Deprecated Sign-In Method
Problem
For web apps, the signIn method is deprecated and will be removed by Q2 2024. It can’t reliably provide an idToken, leading to unreliable authentication.
Solution
Step 1. Replace the deprecated method: Import the google_sign_in_web package:
import 'package:google_sign_in_web/google_sign_in_web.dart';
Step 2. Use renderButton() method: Replace your custom Google sign-in button with the following:
GoogleSignInPlugin().renderButton();Step 3. Listen for user updates:
_googleSignInPlugin.userDataEvents!.listen((data) async {
  if (data != null) {
     final user = AuthUser(
       id: data.id,
       displayName: data.displayName ?? 'username',
       email: data.email,
       photoUrl: data.photoUrl,
     );

     final auth = FirebaseAuth.instance;
     final credential = GoogleAuthProvider.credential(idToken: data.idToken);
     final fbUser = (await auth.signInWithCredential(credential)).user;
   }
});
This method is future-proof and ensures smooth user authentication via Google Sign-In for web applications. For more details, see the official Google Sign-In Web Documentation.
Email-Password Authentication Issues
Handling RecaptchaAction Error
Problem
When users sign up with an email that’s already associated with another provider (e.g., Google or Facebook), they may encounter this error:
Initial task failed for action RecaptchaAction(action=signUpPassword) with exception - The email address is already in use by another account.
Preconditions
- The user has already signed up using Google or Facebook sign-in.
- The user attempts to sign up using an email-password option with the same email address.
Solution
This behavior is expected and cannot be "fixed" per se. Instead, developers should handle this error gracefully and notify the user about the issue.
Here’s how to handle the error in Flutter:
Future<(User?, RegistrationError?)> registerEmailPassword({
  required String email,
  required String password,
}) async {
  try {
    final res = await _auth.createUserWithEmailAndPassword(
      email: email,
      password: password,
    );
    return (res.user, res.user == null ? RegistrationError.unknown : null);
  } on FirebaseAuthException catch (e) {
    return (
      null,
      switch (e.code) {
        'email-already-in-use' => RegistrationError.emailAlreadyInUse,
        'invalid-email' => RegistrationError.invalidEmail,
        'operation-not-allowed' => RegistrationError.operationNotAllowed,
        'weak-password' => RegistrationError.weakPassword,
        _ => RegistrationError.unknown,
      },
    );
  }
}
enum used:
enum RegistrationError {
  emailAlreadyInUse,
  invalidEmail,
  operationNotAllowed,
  weakPassword,
  unknown,
}
In this example, the error is caught, and the user is informed about the specific problem (e.g., "email already in use") so they can take the appropriate action.
Handling Multiple Providers with a Single Email
Option 1: Create multiple accounts for each identity provider
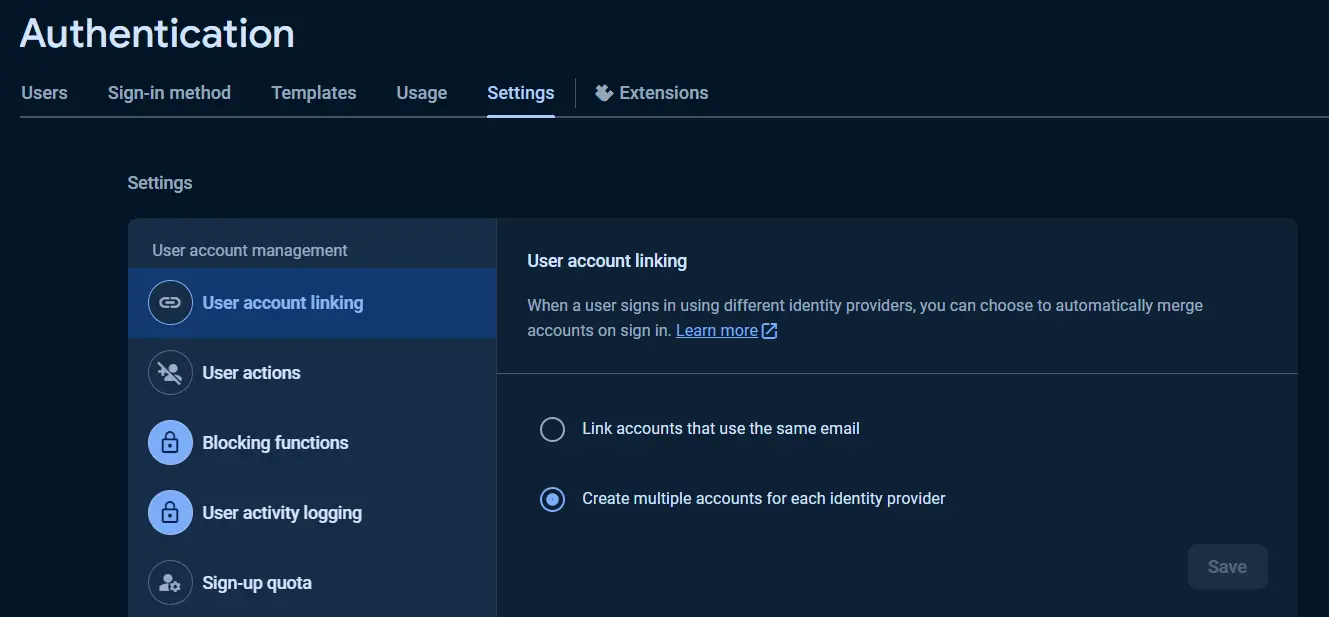
In this case we can see situations like this (Apple will also be a separate provider ⇒ separate user).

But when it comes to the Email sign-up we face this issue:
Initial task failed for action RecaptchaAction(action=signUpPassword)with exception - The email address is already in use by another account.Option 2: Link accounts that use the same email
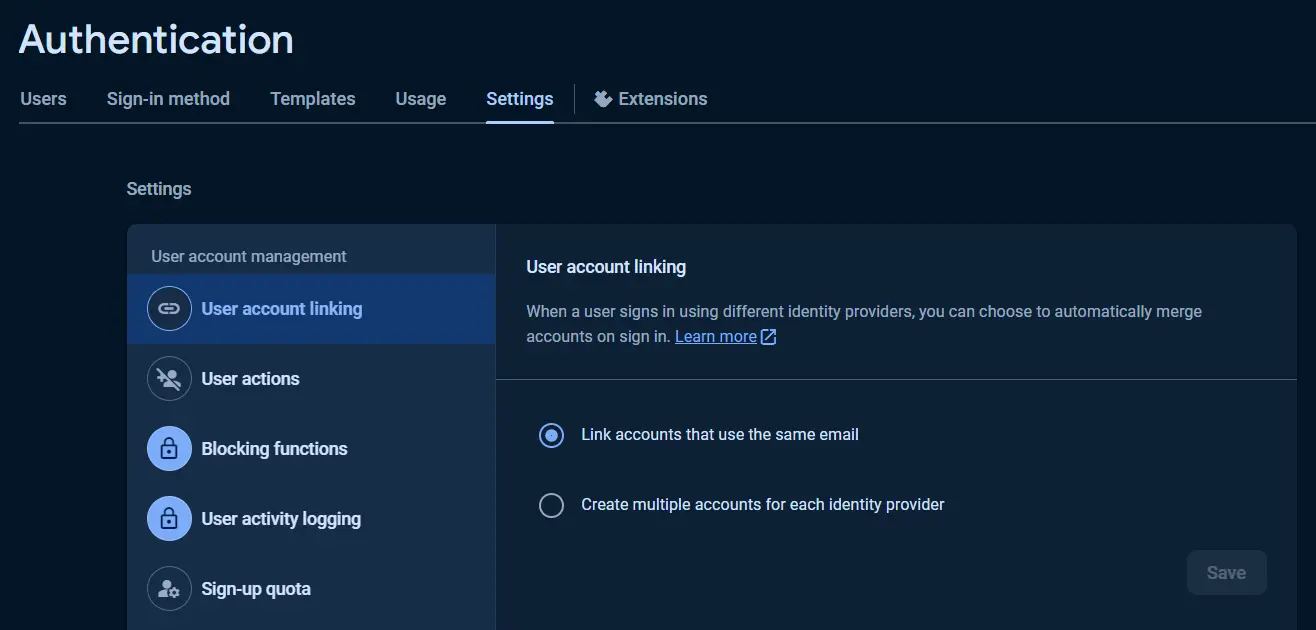

This option was tested in several scenarios and the results are listed below. Spoiler: just checking the "Link accounts that use the same email" option in the Firebase console does not automatically do that for you, it works strange and sometimes doesn’t work at all, so we have created a solution for this.
Scenario 1: Google ⇒ Email / Password ⇒ Google + Email / Password
- First time sign up with Google;

- Sign out;
- Go to “forgot password” screen that calls
firebaseAuth.sendPasswordResetEmail(email: email)and set password for the email from your Google account (igarkun@flutter.wtf in our case);

- Sign out;
- Sign in with Google again;

Now both sign in options work!
Scenario 2: Facebook ⇒ Email / Password
- First time sign up with Facebook;

- Sign out;
- Go to “forgot password” screen that calls
firebaseAuth.sendPasswordResetEmail(email: email)and set password for the email from your Google account (igarkun@flutter.wtf in our case);

- Sign out;
- Sign in with Facebook again;
[ERROR:flutter/runtime/dart_vm_initializer.cc(41)] Unhandled Exception: [firebase_auth/account-exists-with-different-credential] An account already exists with the same email address but different sign-in credentials. Sign in using a provider associated with this email address.Scenario 3: Facebook ⇒ Google
- First time sign up with Facebook;

- Sign out;
- Sign in with Google that uses the same email (ivan.wtf.dev@inbox.lv in our case);

- Sign out;
- Sign in with Facebook again;
[ERROR:flutter/runtime/dart_vm_initializer.cc(41)] Unhandled Exception: [firebase_auth/account-exists-with-different-credential] An account already exists with the same email address but different sign-in credentials. Sign in using a provider associated with this email address.Solution
Step 1. Select any option you want, we won’t allow user to sign-in using different providers (with one email) so this choice will not affect anything;

Step 2. Create file provider_ids.dart with this content:
import 'package:firebase_auth/firebase_auth.dart';

abstract class SignInProviders {
  static final String google = GoogleAuthProvider.PROVIDER_ID;
  static final String facebook = FacebookAuthProvider.PROVIDER_ID;
  static final String apple = AppleAuthProvider.PROVIDER_ID;
  static final String email = EmailAuthProvider.PROVIDER_ID;
}
Add any providers as you want (every sign-in method you use in your app should be added here).
Step 3. Create UserProfile entity that will be stored as a document in Firestore collection. For example here’s an entity that we will use:
import 'package:freezed_annotation/freezed_annotation.dart';

part 'user.freezed.dart';
part 'user.g.dart';

@freezed
class UserProfile with _$UserProfile {
  const factory UserProfile({
    required String id,
    required List<String> signInProviderIds,
    @JsonKey(name: UserProfile.emailField) String? email,
    @Default('username') String username,
    String? avatar,
  }) = _UserProfile;

  const UserProfile._();

  factory UserProfile.fromJson(Map<String, dynamic> json) =>
      _$UserProfileFromJson(json);

  static const String emailField = 'email';
}
Step 4. Now let’s implement Google sign-in flow. Main idea is to allow user to sign in using Google only if his profile is null (means that this user is new) or if his profile contains SignInProviders.google.
Step 4.1. AccountRepository with signInWithGoogle method:
class AccountRepository {
  AccountRepository(
    this._authClient,
    this._remoteDataSource, {
    this.iOSClientId,
    this.webClientId,
  });

  final AuthClient _authClient;
  final RemoteDataSource _remoteDataSource;

  final String? iOSClientId;
  final String? webClientId;

  String? get _clientId {
    if (AppPlatform.isIOS) {
      return iOSClientId;
    } else if (AppPlatform.isWeb) {
      return webClientId;
    }
    return null;
  }

  Future<bool> signInWithGoogle() async {
    // 4.2 Method to get GoogleSignInAccount in AuthClient
    final googleUser = await _authClient.signInWithGoogle(_clientId);
    if (googleUser == null) return false;

    final email = googleUser.email;
    // 4.3 Method to fetch profile from Firestore using email
    final profile = await _remoteDataSource.getUserByEmail(email);

    if (profile == null ||
        profile.signInProviderIds.contains(SignInProviders.google)) {
      // If no profile found or profile contains google signInProvider we continue
      // performing Google sign in
      final googleAuth = await googleUser.authentication;

      // 4.4 Method to perform Firebase auth and get necessary user data
      final authUser = await _authClient.getAuthUser(
        GoogleAuthProvider.credential(
          accessToken: googleAuth.accessToken,
          idToken: googleAuth.idToken,
        ),
      );

      return _onAuthUserReceived(authUser, SignInProviders.google);
    } else {
      // If profile found and it doesn't contain google signInProvider we do not
      // allow user to sign in using Google
      return false;
    }
  }

  Future<bool> _onAuthUserReceived(
    AuthUser? authUser,
    String signInProvider,
  ) async {
    if (authUser != null) {
      // 4.5 Method to fetch profile from Firestore using id
      var profile = await _remoteDataSource.getUserById(authUser.id);
      if (profile == null) {
        profile = UserProfile(
          id: authUser.id,
          email: authUser.email,
          username: authUser.displayName,
          signInProviderIds: [signInProvider],
          status: OfflineStatus.add,
        );
        // 4.6 Method to create profile in Firestore
        await _remoteDataSource.createUser(profile);
      }
      return true;
    } else {
      return false;
    }
  }
}
Step 4.2. AuthClient with method to get GoogleSignInAccount:
class AuthClient {
  AuthClient() : _firebaseAuth = FirebaseAuth.instance;

  final FirebaseAuth _firebaseAuth;

  Future<GoogleSignInAccount?> signInWithGoogle([String? clientId]) async {
    if (AppPlatform.isIOS) {
      assert(
        clientId != null,
        'iOSClientId should be provided, go to the Firebase project and '
        'download "GoogleService-Info.plist" for the current app, use '
        'CLIENT_ID from there',
      );
    }
    final googleSignIn = _googleSignIn(clientId);
    try {
      final googleUser = await googleSignIn.signIn();
      return googleUser;
    } on FirebaseAuthException catch (error) {
      log('signInWithGoogle: ${error.code} | $error');
      return null;
    }
  }

  GoogleSignIn _googleSignIn(String? clientId) {
    return GoogleSignIn(
      scopes: ['email'],
      clientId: clientId,
    );
  }
}
Step 4.3. RemoteDataSource with method to fetch profile from Firestore using email:
import 'package:cloud_firestore/cloud_firestore.dart';

class RemoteDataSource {
  final FirebaseFirestore _fs = FirebaseFirestore.instance;

  static const String _usersCollection = 'users';

  @override
  Future<UserProfile?> getUserByEmail(String email) async {
    final snapshot = await _fs
        .collection(_usersCollection)
        .where(UserProfile.emailField, isEqualTo: email)
        .get();
    if (snapshot.docs.isNotEmpty) {
      final doc = snapshot.docs.single;
      return UserProfile.fromJson(doc.data());
    }
    return null;
  }
}
Step 4.4. Method to perform Firebase auth and get necessary user data in AuthClient:
Future<AuthUser?> getAuthUser(OAuthCredential credential) async {
  final user =
    (await _firebaseAuth.signInWithCredential(credential)).user;
  if (user != null) {
    return AuthUser(
      id: user.uid,
      email: user.email,
      displayName: user.displayName ?? 'username',
    );
  }
  return null;
}AuthUser entity used to pass required data from AuthClient. In our case AccountRepository will use this data to create UserProfile entity.
import 'package:freezed_annotation/freezed_annotation.dart';

part 'auth_user.freezed.dart';

@freezed
class AuthUser with _$AuthUser {
  const factory AuthUser({
    required String id,
    @Default('username') String displayName,
    String? email,
    String? phoneNumber,
  }) = _AuthUser;
}
Step 4.5. Method to fetch profile from Firestore using id in RemoteDataSource:
Future<UserProfile?> getUserById(String id) async {
  final userDoc = await _fs.collection(_usersCollection).doc(id).get();
  if (userDoc.data() != null) {
    return UserProfile.fromJson(userDoc.data()!);
  }
  return null;
}Step 4.6. Method to create profile in Firestore in RemoteDataSource:
Future<void> createUser(UserProfile user) =>
_fs.collection(_usersCollection).doc(user.id).set(user.toJson());Step 5. Now our user is authenticated using Google sign-in and let’s imagine that he wants to use his Facebook account with the same email (Facebook with different email won’t work for us because our UserProfile entity has a single String email field. Use more complex implementation to support connecting Facebook or any other provider with email different from the main one).
Step 5.1. Implement Facebook auth button on AccountSettings screen or anywhere else. This button should be only available when user’s UserProfile doesn’t contain SignInProviders.facebook provider.
Step 5.2. Method to connect Facebook provider to the user in AccountRepository:
Future<bool> connectFacebook() async {
  // Get FBSignInAccount from AuthClient
  final fbReturn = await _authClient.signInWithFacebook();
  if (fbReturn == null || fbReturn.email == null) return false;
  final fbEmail = fbReturn.email!;

  // Get current user ID and profile
  final userId = _authClient.getCurrentUserId()!;
  final profile = await _remoteDataSource.getUserById();

  // Ensure Facebook email matches user profile email
  if (fbEmail != profile!.email) {
    // Only providers with matching emails are supported
    return false;
  }

  // Connect Facebook credentials
  final userCredential = await _authClient.connectCredential(
    FacebookAuthProvider.credential(fbReturn.token!.token),
  );

  if (userCredential != null) {
    // Update corresponding UserProfile entity
    await _updateUser(userCredential);
    return true;
  }

  return false;
}
Step 5.3. Method to get FBSignInAccount (our custom class) in AuthClient:
Future<FBSignInAccount?> signInWithFacebook() async {
  final fb = FacebookLogin();
  final result = await fb.logIn(
    permissions: [
      FacebookPermission.publicProfile,
      FacebookPermission.email,
    ],
  );

  switch (result.status) {
    case FacebookLoginStatus.success:
      final accessToken = result.accessToken;
      final profile = await fb.getUserProfile();
      final email = await fb.getUserEmail();
      if (email != null) {
        Logger.logPurple('And your email is $email');
      }
      return FBSignInAccount(
        profile: profile,
        email: email,
        token: accessToken,
      );

    case FacebookLoginStatus.cancel:
      // User cancel log in
      break;
    case FacebookLoginStatus.error:
      // Log in failed
      Logger.logError('Error while log in: ${result.error}');
  }
  return null;
}
FBSignInAccount class:
class FBSignInAccount {
  FBSignInAccount({
    required this.profile,
    required this.email,
    required this.token,
  });

  final FacebookUserProfile? profile;
  final String? email;
  final FacebookAccessToken? token;
}Step 5.4. Method to get current user id in AuthClient:
String? getCurrentUserId() => _firebaseAuth.currentUser?.uid;Step 5.5. Method to connect credentials in AuthClient:
Future<UserCredential?> connectCredential(AuthCredential credential) async {
  try {
    // Attempt to link the credential to the current user
    final userCredential = await FirebaseAuth
      .instance
      .currentUser!
      .linkWithCredential(credential);
    return userCredential;
  } on FirebaseAuthException catch (e) {
    switch (e.code) {
      case 'provider-already-linked':
        log('The provider has already been linked to the user.');
        break;
      case 'invalid-credential':
        log("The provider's credential is not valid.");
        break;
      case 'credential-already-in-use':
        log(
          'The account corresponding to the credential already exists, '
          'or is already linked to a Firebase User.',
        );
        break;
      default:
        log('Unknown error.');
    }
    return null;
  }
}
Step 5.6. Method to update corresponding UserProfile entity in AccountRepository:
Future<void> _updateUser(UserCredential cred, UserProfile profile) async {
  // 5.8 Method to update profile in Firestore
  await _remoteDataSource.updateUser(
    profile.copyWith(
      signInProviderIds: cred.user?.providerData
          .map((p) => p.providerId)
          .toList() ??
        [
          ..._userRepository.user!.signInProviderIds,
          cred.credential!.providerId,
        ],
    ),
  );
}Step 5.7. Method to update profile in Firestore in RemoteDataSource:
Future<void> updateUser(UserProfile user) =>
  _fs.collection(_usersCollection).doc(user.id).update(user.toJson());
Step 6. Now user can log in to the app using two options: Google and Facebook, let’s also implement connecting Email-password option.
Step 6.1. Implement email connect form on AccountSettings screen or anywhere else. This form should be only available when user’s UserProfile doesn’t contain SignInProviders.email provider.
Step 6.2. Method to connect Email provider to the user in AccountRepository:
Future<bool> connectEmail({
  required String email,
  required String password,
}) async {
  final profile = await _userRepository.getUserById(
    _authClient.getCurrentUserId()!,
  );

  if (email != profile!.email) {
    return false;
  }

  final userCredential = await _authClient.connectCredential(
    EmailAuthProvider.credential(
      email: email,
      password: password,
    ),
  );

  if (userCredential != null) {
    await _updateUser(userCredential);
    return true;
  }

  return false;
}Advanced Authentication Features
Password Reset
Resetting passwords is a common feature in most applications. The process involves sending an email to the user with a password reset link, which redirects them to a page within your app to complete the password reset. Implementing this requires deep link support in your app.
Step 1. Implement deep links support with your domain (App Links and Universal Links);
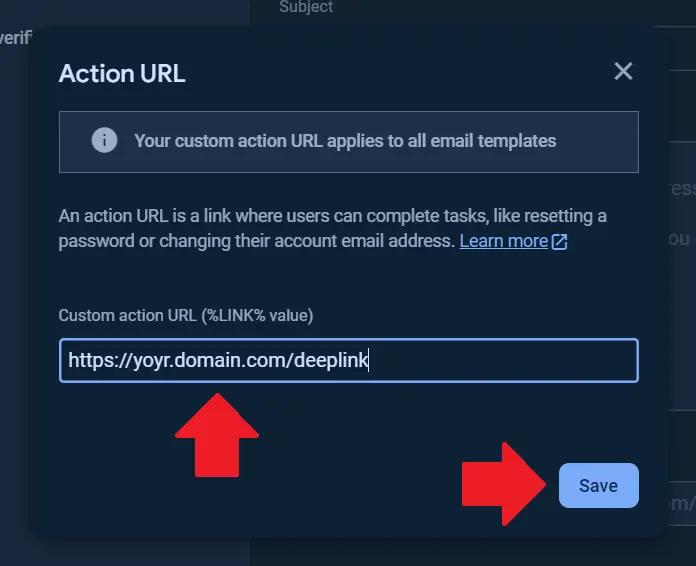
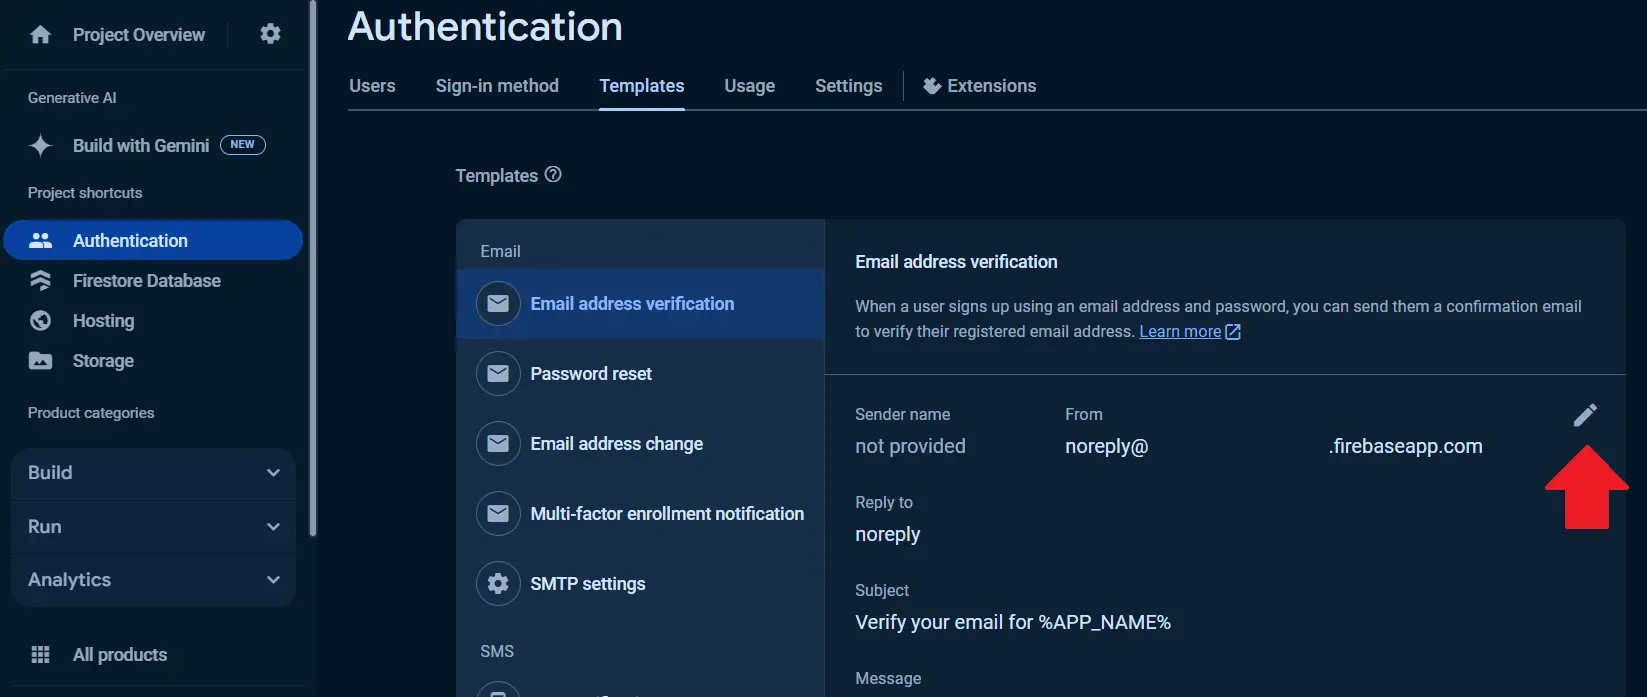
Step 2. Set action url with your domain for the “Password reset” letters:

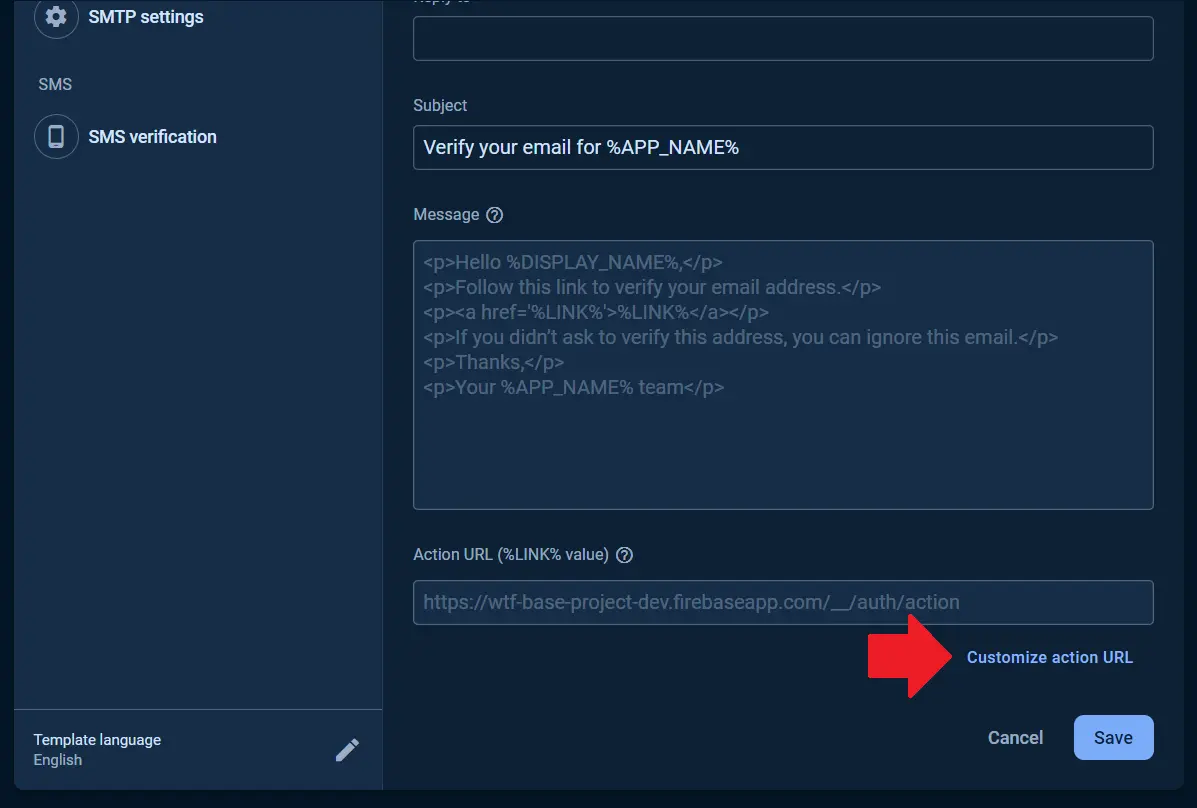
DeepLinkHandler implementation + Verifying email implementation).Step 3. Implement email input form with “Send reset password letter” button.
Step 4. Method to reset password in AccountRepository:
Future<bool> sendResetPasswordLetter(String email) async {
  // Method to fetch profile from Firestore using email (can be found above)
  final user = await _remoteDataSource.getUserByEmail(email);
  if (user != null &&
      user.signInProviderIds.contains(SignInProviders.email)) {
    // Method to send reset password letter
    await _authClient.sendResetPasswordLetter(email);
    return true;
  } else {
    return false;
  }
}Step 5. Method to send reset password letter in AuthClient:
Future<void> sendResetPasswordLetter(String email) async {
  try {
    await _firebaseAuth.sendPasswordResetEmail(email: email);
  } on FirebaseException catch (e) {
    log('${e.code} ${e.message}');
  }
}Now we can send request reset password letter and the link from this letter opens in our app as a deep link. Our next step will be to handle this deep link in our app.
Our DeepLinkHandler implementation was made for the GoRouter, so if you use other navigation library you should implement a solution for yourself.
Step 6. DeepLinkHandler class:
import 'dart:developer';

abstract class DeepLinkHandler {
  static String? handle(Uri link) {
    final mode = link.queryParameters['mode'];

    log('Deep link received: $link');

    if (mode == 'resetPassword') {
      // ResetPassword route;

      final uri = Uri(
        path: '/reset-password',
        queryParameters: link.queryParameters,
      );

      log('Redirecting to $uri in resetPassword mode');

      return uri.toString();
    }

    log('Unsupported deep link $link');
    return null;
  }
}
Step 7. GoRouterconfiguration:
final router = GoRouter(
  navigatorKey: navigatorKey,
  routes: [
    // Your routes here
    GoRoute(
      path: '/deeplink',
      redirect: (_, state) => DeepLinkHandler.handle(state.uri),
      builder: (_, __) => throw UnimplementedError(),
    ),
    GoRoute(
      path: '/reset-password',
      builder: (_, state) {
        // Your screen implementation. Should have [String? code] field
        return ResetPasswordScreen(
          code: state.uri.queryParameters['oobCode'],
        );
      },
    ),
  ],
);Firebase reset pwd link ⇒ GoRouter ⇒ '/deeplink' route ⇒ DeepLinkHandler ⇒ '/reset-password' route ⇒ ResetPasswordScreen with new password input ⇒
confirmPasswordReset method in AccountRepository ⇒ confirmPasswordReset method in AuthClient.Step 8. Confirm password methods implementations in AccountRepository and AuthClient:
Future<void> confirmPasswordReset(String code, String newPassword) =>
_authClient.confirmPasswordReset(code, newPassword);Future<void> confirmPasswordReset(String code, String newPassword) async {
try {
await _firebaseAuth.confirmPasswordReset(
code: code,
newPassword: newPassword,
);
} on FirebaseException catch (e) {
log('${e.code} ${e.message}');
}
}Email Verification
Similar to password resets, verifying email addresses is an important security measure, especially for apps that rely on email-based authentication.
Step 1. Set action url with your domain for the “Email address verification” letters:
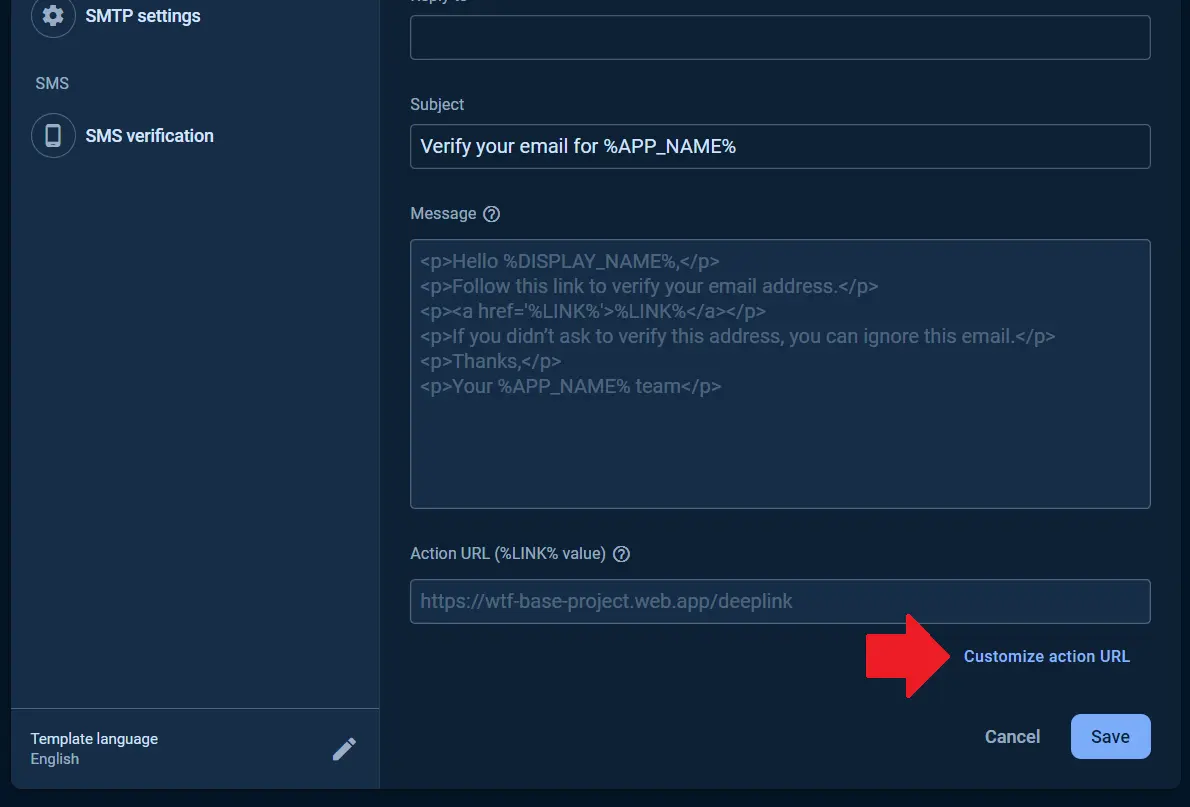

Step 2. Send email verification methods implementations in AccountRepository and AuthClient:
Future<void> sendEmailVerification() =>
_authClient.sendEmailVerification();FirebaseAuth.instance.currentUser != null).Future<void> sendEmailVerification() async {
final user = _firebaseAuth.currentUser;
if (user == null) throw ArgumentError.notNull();
return user.sendEmailVerification();
}Step 3. Add else statement to the DeepLinkHandler's handle method:
if (mode == 'resetPassword') {
        ...
} else if (mode == 'verifyEmail') {
  final uri = Uri(
    path: '/email-verification',
    queryParameters: link.queryParameters,
  );

  log('Redirecting to $uri in verifyEmail mode');

  return uri.toString();
}
Step 4. Add new route to the GoRouter configuration
GoRoute(
  path: '/email-verification',
  builder: (_, state) {
    return EmailVerificationScreen(
      code: state.uri.queryParameters['oobCode'],
    );
  },
)Firebase verify email link ⇒ GoRouter ⇒ '/deeplink' route ⇒ DeepLinkHandler ⇒ '/email-verification' route ⇒ EmailVerificationScreen ⇒
verifyEmail method in AccountRepository ⇒ verifyEmail method in AuthClient Then we can call checkEmailVerified method in AuthClient to make sure that verification was successful.Step 5. Verify email methods implementations in AccountRepository and AuthClient:
Future<void> verifyEmail(String code) => _authClient.verifyEmail(code); Future<void> verifyEmail(String code) => _firebaseAuth.applyActionCode(code);Step 6. Method for checking if email was verified in AuthClient:
  Future<bool> checkEmailVerified() async {
    await _firebaseAuth.currentUser?.reload();
    final user = _firebaseAuth.currentUser;
    if (user == null) throw ArgumentError.notNull();
    return user.emailVerified;
}Conclusion
If you're building your app with Flutter and Firebase, remember to handle errors gracefully and provide clear instructions for your users. Whether you're troubleshooting Google Sign-In on Android, transitioning to new authentication methods on the Web, or linking multiple sign-in options.
By implementing these solutions, you’ll enhance the overall usability of your Flutter app. For additional resources, refer to Firebase's official documentation and Flutter's authentication guides.
If you're faced with authentication issues, we at What the Flutter can fix them shortly. We can also schedule a technical consultation to discuss all possible solutions and ensure your app runs smoothly. Reach out today via the form below.